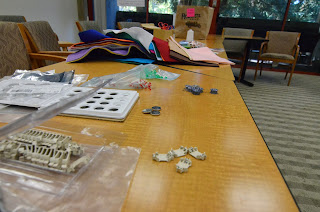
All laid out, ready to go!
Session Intro / Context Setting
Understanding the Audience
Gettin' To Work!
Mistakes = Learning Opportunities
Final Products!
Activity Materials List / Sources
The session was in the afternoon, and started with quite a light crowd... about 15 participants. I began setting the stage by describing the context of my awesome school and how our "Maker" / Innovation / FabLab / Design Thinking program is underway.
Intro
We have had some interesting jumps along the way that have guided the goals of our program, including an unintended but firmly established culture of using glue guns for EVERYTHING, and a strong divide between the "Tech is AWESOME!" kids and the "I'm just not a tech person..." kids. Noticing this divide is what really prompted my wonderful colleague Shaye' and I to develop and implement our "Wired For Art" course - to begin to show that technology-driven art and engineering needn't be limited to kids who have already established expertise and comfort in programming and robotics.
Thus, these activities: designing and creating one's own cute, fancy, flashy, geeky, fun accessories and crafts, learning and applying basic electronics circuitry along the way. I prepared to give the workshop participants my big prompt: Set aside your understanding of circuitry, and think from a kid's point-of-view. From your playtime with MakeyMakey, you know only that a circuit has to be closed - there must be a loop for electricity to flow from one side of the battery around to the other, and hopefully you'll pass through some LEDs along the way to make them light up.
Understanding the Audience
It was really at this point that I realized that the fabulous, enthusiastic, inquisitive participants in my workshop actually wouldn't need to put on artificial student hats! I had a couple questions I asked to gauge just how much setting-aside the crowd would need to do:
- How many of you can read a resistor without using a key? (answer: none, and one "there are people who can do that?)
- How many of you can spot why this student design idea won't work on first try? (answer: none)
"Oh, hey wait..." I said. "This is actually a bit different from the workshop I was planning to lead..."
So, rather than jumping straight to the prompt, I pulled everyone to the tabled in the back of the room to introduce them to our materials. I introduced our conductive thread, coin batteries and battery holders, and LEDs. I still wasn't going to give them more info than I gave my students, and was actually pretty excited to support some fabrication-in-education enthusiastic adults in their first forays into basic circuitry!
Gettin' to Work!
After that introduction, THEN the prompt: Create something cool! I recommended starting with a simple wrist cuff - as I recommended to my own students - and using a snap as a switch to be able to open the cuff / open the circuit / turn off the LED. Draw the sketch out on a piece of paper first, then grab materials and get to work!
Here are some of my participants hard at work:
Mistakes = Learning Opportunities
They ran into THE EXACT SAME CHALLENGES that my students ran into!
- running a single piece of thread across the whole circuit, shorting across the LEDs
- only connecting one side of an element - like the battery - to the circuit
- reversing the LED leads!
- tying the battery holder in such that the thread shorts between the positive and negative side
- including too many LEDs in a series circuit, with too much voltage drop to light the LEDs
- craftsman ship matters! loose, dangly threads lead to shorts or disconnects
(BTW, there are several ways to attach LED leads into your conductive thread circuit... My favorites are (1) bending the leads into loops and tying thread into the loops, or (2) folding the leads in half and looping thread through the half AND sewing around the folded lead to hold it steadily in place.)
Each of these cases opened a great opportunity for deeper learning about circuit design, including several people who ended up making parallel circuits instead to be able to light three or more LEDs with our teeny 3V batteries.
Final Products!
The session, of course, went a tad long... Everyone HAD to finish their creations! (Andrea even finished hers during the final panel of the day, and found me to snag her picture afterwards!) Here are a few of their proud, happy faces with their awesome LED accessories:
(Yes, that's an octopus - quadropus? - hugging a smart phone...)
Materials List / Sources
(edit: Did you land here looking for the June 2014 Design, Do, Discover page? It's here.)
You can put together a whole kit for several classes for a little more than $100! I've had several requests for info for my materials sources, since I've managed to find my way around digikey.com, so here they are!
- lithium ion coin batteries (digikey)
- coin battery holders (digikey - these are not "sewable" and you have to use needle-nose pliers to bend the surface mount components to render them "sewable." But MUCH cheaper)
- simple, low voltage red LEDs (digikey)
- simple, low voltage green LEDs (digikey)
- conductive thread (sparkfun)
- packs of felt (Jo-Ann Fabrics)
- packs of needles (Jo-Ann Fabrics)
- some colorful thread for decoration (Jo-Ann Fabrics)
- sewable snaps (Jo-Ann Fabrics)
- scissors
- needle-nose pliers for bending battery holder leads and LED leads (Jo-Ann or wherever)


This is awesome! Thank you!
ReplyDeleteYou're welcome! I hope it makes it easier to gather a basic kit of materials and get down to the business of making cool stuff!
ReplyDelete